

Since the airplane was already flipped over, I figured now was a good time to work on "layup #6". These are the 1-ply BID layups that transition the inside strake skin with the bottom surface of the top longeron. Page 21-4 mentions this layup in the first paragraph, implying it can be done the same day the strakes are installed... but since I am not a robot, I waited until the airplane was upside-down and let gravity be my friend rather than my enemy. (Layup #6 can also be seen on pg 21-6 section C-C).
I put a chair underneath the airplane so I could work on the stowage areas while sitting down...


Knowing I was going to be sanding... I figured it would be wise to wear a good mask since I'm heading into a confined space!

I'm in! Time to work!

I started by sanding all surfaces that were going to get overlapped with 1-ply BID...

An LED light helped light the compartments without getting hot... I was already sweat'n bad enough in the cave!

I made sure all surfaces were nice and flush... and applied flox corners/channels wherever I could to give them extra strength...


Notice the flox corner...

Sanded the surfaces that were going to get overlapped...


This is the aft compartment near the fuel sight gauge... I had previously cut the fuselage wall at an angle so that it would be flush with the BAB bulkhead... giving the passenger an extra inch of elbow room...


With everything prepped, I vacuumed and painted all overlapping surfaces with plain epoxy. I then used dry micro to help transition any uneven surfaces... to act like a "ramp"...

I applied flox inside the flox corners and installed 1-ply BID... then used a brush to wet everything out...


After cure, I trimmed and sanded everything up...


Before I could flip the airplane back right-side-up... I had to make and install the fuel blisters. The fuel blisters allow the fuel lines to have fuel fed into them even in unusual attitudes. Imagine using the left tank and making a left turn - all the fuel would rush outboard and the fuel line would be starved. The idea is that the airplane isn't in an unusual attitude for very long and during that time, there is plenty of fuel in the fuel blister to supply fuel to the fuel line.
Pg 21-4 shows the blister's dimensions. I started by cutting an Ikea shelf that was laying around and screwed them together to form an "L". I then used the dimensions on the plans to draw the outline...


Since I need two blisters, I figured I would make a second one. I then sanded them to the correct contour.

Looking good!

I used a little bit of wax on the Ikea shelf to act like a release agent. I'm going to sand the surfaces anyway so any wax that sticks to the blister will be removed. The plans say 3-ply BID... but I went with 4 so that I could really sand it without worrying about sanding too much.


After cure, I used a spatula to pop it off the jig...

I didn't care about ruining the foam... since I now needed to scrape the foam off anyway...


After scraping all the foam off, I now had to sand the surface for a clean finish...


I also trimmed the borders for a nice 0.5" lip all around...

I then prepped the surfaces where the blisters were going to get attached...


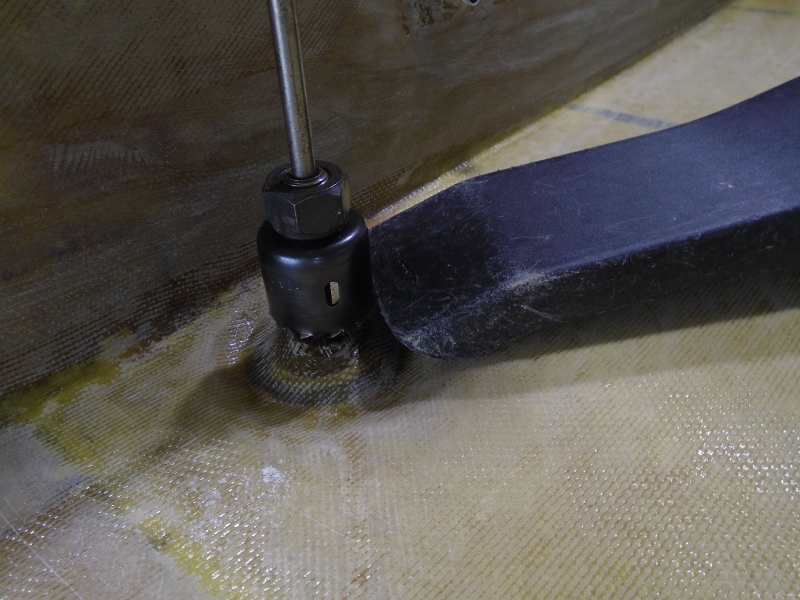
Before installing the blisters, I had to open up the fuel drain. I started by drilling a 1/4" pilot hole...

And then used a hole saw to get the 1.25" dia hole...

I placed a vacuum as close as I could to try and prevent contamination getting into the fuel tank... I was careful not to go in too deep so as not to ruin the fuel screen on the other side!
Baaaaam! Perfect fuel drain! I stuck the vacuum inside to remove any contaminants that had fallen in and were captured by the fuel screen.

Just when I thought everything was ready to install the blisters, I thought "Wait a minute! How am I supposed to press the blisters onto the fuselage sides?! After much thinking, I came up with this: a giant clamp made out of 2x1's... I made 3 of these...

Notice the "set screw" at the bottom of one of the legs... I'll explain later...

So with everything prepped, it was now time to install the blisters... I started by painting plain epoxy on the entire inside surface of the blister... and on the inside of the 0.5" lip...


I then mixed up some flox and applied a bead all around the blister lip...

And installed the blister... I then repeated this for the other side...

The next few steps happened so fast, I didn't get a chance to take pics, but I'll explain.
First, I placed plastic wrap over the blister and placed heavy bricks over the blister's lip that bonds to the strake. The plastic wrap was to prevent the brick from bonding to the blister from the excess flox. I then used the giant clamps I made out of the 2x1 to press the blisters up onto the fuselage.

Here's a close-up of the plastic wrap and bricks - weighing the blister down onto the strake.


On the side with the "set screws", I placed a wood spacer between the blister's lip and the set screw so I could tighten the screw and not damage the blister... this provided enough force to squeeze the blisters onto the fuselage wall.


After everything cured, I removed the bricks and plastic wrap...

Here's another shot of the set screws and how they held the blister in place while it cured...


The plastic wrap left imprints all over... but that's ok, I had to sand the surfaces anyway and prep them for the 1-ply BID that overlaps onto the blister's lip.

Post-sanding...

I'd say we are ready for 1-ply BID!

I started by painting plain epoxy around the entire blister...

I then put a small amount of wet flox to help transition between the blister lip and strake (or fuselage wall)

1-ply of 1" BID tape all around... here I already wetted out the ply on the strake... and about to wet out the ply on the fuselage wall..

Peel ply all around for a nice smooth transition!


Next day, I removed the peel ply and cleaned everything up! WOW! They look great!


Perfectly flush against the strake and fuselage wall!

And there you have it!! Fuel sump blisters are installed! Ready to flip the bird... again...

No comments:
Post a Comment