

With the canopy hinges installed, it was now time to install the cross-brace that keeps the canopy from "spreading" (width wise). The plans has us install two cross-braces: one in the middle and one towards the aft of the canopy; however, many Long-EZ passengers complain that the aft canopy brace hits them on the head when closing the canopy - so current builders leave the aft brace off - as will I.
Also, I will install a gas-spring to the middle brace. This will help open and close the canopy - similar to the trunk lid of an SUV.
Ok, so let's get started! First, I removed the canopy from the fuselage and propped it on stands.

The plans say to mill out a cavity, fill it with flox, and install the brace. But since I'm installing a gas spring to it, I needed a way to keep the brace from being torqued out of its hole. After giving this some thought, I created a plan to use the forward most screw (of the aft hinge) to pass through the brace. Since the canopy hinges have hard-points, this would serve as a perfect anchor and keep the brace from torquing out.
Here is the aft canopy hinge...

Zooming in, notice how I removed the forward most screw...

I then reinstalled the canopy onto the fuselage (one of hundreds of times during this process), and marked the locations for the brace on the canopy rails. For the right canopy rail, the brace needed to pass through the hinge screw - so this location was easy.

For the left canopy rail, I aligned it such that the brace will be 100% parallel with the rollover structure tube next to it. (I failed to take a picture of the alignment, so I'm cheating here by showing you the already drilled pic)

This was a bit terrifying since I only had one shot at it!! To my relief, I drilled exactly through the hinge screw hole... here is a shot looking up through the bottom of the canopy rail... you can see the drill bit intersecting the hinge screw hole...


And then drill the left canopy rail (using the marked location that would result in the brace being 100% parallel with the rollover tube in the fuselage)...

Notice how I drilled the left rail all the way through... this was to allow me to slide the brace in through this side (rather than try to force the canopy open the way the plans suggests).

Test fitting the brace through...

I then made a hole on the right end of the brace to allow the hinge screw to pass through it... this will keep the tube from torquing out..

Test fitting it.. perfect fit! Ok, with some overhang on the left side as anticipated...


I reinstalled the canopy (4th millionth time!) and played with the canopy width (by pushing/pulling on the left canopy rail - remember, the right rail is "locked" in position with the hinge screw) until the aft nook aligned flush...

When I had it exactly where I wanted, I marked the brace...

Removed the canopy and the brace... and brought it over to my vice...

I measured about 0.25" inboard from my mark since I didn't want any portion of the brace protruding outboard of the canopy rail.... so notice the second mark....

I then reinstalled the brace (temporarily - still not floxed in) to make sure everything fit well. Since the left rail wasn't floxed in, the canopy was still able to flex (width wise). So I cut a 2x1 to the final width I wanted the canopy and used bondo to "lock" the width.


Before floxing the brace in permanently, I wanted to make sure the gas spring geometry was going to work (can you imagine doing ALL this work, floxing the brace in and then finding out the canopy doesn't open all the way?!)
So I marked where on the rollover tube I wanted the gas spring stud to be located. I measured how high above the fuselage longerons the canopy brace was and translated this height onto the rollover tube.


Speaking of ball stud... let's talk gas springs for a moment. I purchased mine from Mcmaster Carr (https://www.mcmaster.com/4138T71/) Part # 4138T71. This was based on my geometry (the position of the rollover tube with respect to my canopy brace) and a 40 lb push force. Truth be told, I first purchased one that was too short and had to return it for a longer one.

The end sockets are not removable.

But the ball stud is. I didn't like the idea of simply threading the stud to the rollover tube (since the tube is thin-walled and also sits at an angle)... so I also purchased this threaded insert to weld into the rollover tube (https://www.mcmaster.com/97191A250/) part # 97191A250.

The gas spring comes with the ball stud and the lock pin. (although I did purchase additional ball studs with longer threads (https://www.mcmaster.com/9512K63/) 0.75" thread length vs the standard 0.55" that the gas spring comes with.

Here I am showing how the lock pin works... there are two small holes on the top and bottom sides of the ball joint. The ball stud gets press fitted into the joint (leaving that out so you can see the lock pin), the lock pin gets inserted and the collar wrapped around the neck to keep it in place. This keeps the ball stud from popping out of the joint.

For the time being, I simply threaded the ball stud into the rollover structure... and installed the gas spring...

I then reinstalled the canopy (I lost count now...)

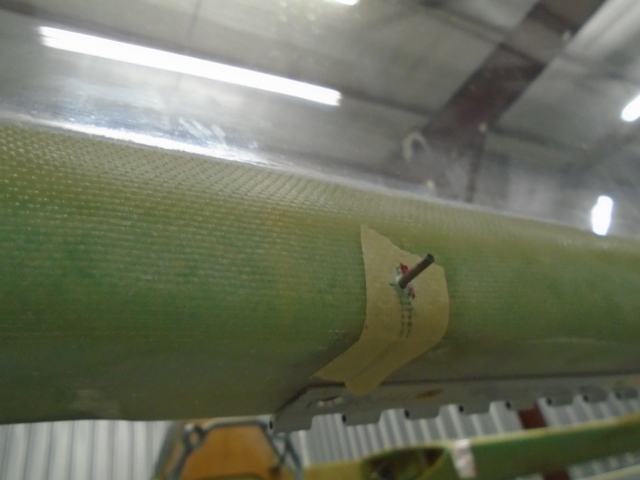
I then marked the location of onto the canopy brace (keep in mind, this is the EXTENDED position)... so I then measured the offset and marked where it would be in the RETRACTED position....

It was hard to see the mark on the black tube, so I put tape over it and marked the tape...

With the mark made, I uninstalled the canopy, removed the brace... and brought it over to the drill press to make a pilot hole.... it was very important to drill the whole at the correct orientation so that it would be perpendicular to the hole at the end where the hinge screw goes through.

I then opened it up to a #F size so I could tap it with a 5/16-18 tap...

Tapping a 5/16-18 thread for the ball stud...


Taaaa-daaaa!! I'm not worried about using a threaded insert here since there is plenty of thread surface (unlike at the rollover structure)....


Look ma, no hands!! I had to be careful here because remember, the brace is not floxed in yet, only being held by that hinge screw...

Ok, so with the canopy opening and closing perfectly, it was time to permanently flox the brace in place for good! I prepped the ends of the brace by sanding and scuffing them up...

On the left end, I drilled a bunch of holes through it to allow the flox to bite...

I may have gone overboard, but hey, no harm...


One canopy brace ready to be installed!

While prepping, it occurred to me that the flox might ooze out of the bottom of the hinge hole...

So I tapped the bottom to keep the flox in...

Also, I prepped the left rail by milling out some foam all the way down to the glass. I wanted to make sure the flox was going to bond to the glass of the canopy rail for a strong bond...

With everything prepped, I mixed up flox and used a ziplock bag to insert flox into the right rail first. Painted plain epoxy to the ends of the brace and inserted the brace through. I then used a spare AN3 bolt and inserted it through the hinge hole to make sure the brace was all the way in and in the correct orientation. I then filled the left rail hole with flox until it oozed out on the other side...


I removed the spare AN3 bolt so that it would not get bonded in permanently...

The next day after it cured, I re-drilled the hinge hole to remove some of the flox that had fallen into the hinge hole...

Perfect!!


I reinstalled the hinge screw, removed the 2x1 brace and cleaned off all the bondo residue...


And reinstalled the canopy.... (I told you I was going to reinstall the canopy a million times throughout this process!)


Oh yea, I almost forget... we still have to weld the inserts!


No comments:
Post a Comment