
This is one of those "fine details" the plans make it sound so easy, but ended up requiring a lot of thought. The plans actually has us glass the foam back in Chapter 12 (pg 12-2), but I was uncomfortable sealing the contour when the nose wasn't even completed (which happens later in Chapter 13). I also knew that I was going to use the "offset elevator torque tubes", which reduces the size of the opening required for the elevator torque tube that crosses through the fuselage wall.
So I saved all this work for Chapter 24, where I had the nose, canard, and top cover completed. The first step was to complete the forward lip of the canard cover. Mainly the foam that was still exposed on the sides. I sanded them to be symmetrical and to what I thought was a pleasantly aesthetic contour.
I used a dremel to remove the foam/micro and make a nice flox corner.
I then added flox and slurry...
And glassed 2 ply BID on both sides...
After cure I trimmed everything up nice and flush...
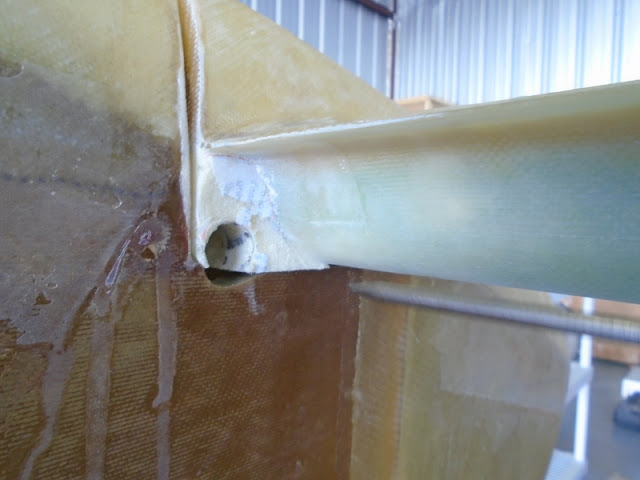
Next, I wanted to focus on sealing off the area above and around the elevator torque tube... notice the large opening northwest of the torque tube...
I removed the canard (again)... and applied electrical tape around the torque tube to protect it from the pour foam it was about to be doused with...
I know what you're thinking... "what the heck are you doing here?!"... Ok let me explain.. I created a "pocket" out of cards to allow me to pour the liquid foam into... and I taped off any openings I thought it would leak...
I then poured liquid foam into the pocket and let it cure..
The foam cures in a few minutes, but I typically let it sit for a day. I found this reduces the chances of the foam shrinking. I then removed the tape/cards and began to sand the foam...
I then removed the elevator torque tube...
It was now time to clean up the (what should we call these?)... ETTSOs? Elevator Torque Tube Stand Offs?
So I reinstalled the canard (again)...
And marked along the fuselage wall...
I removed the canard and sanded the ETTSO up to the line... then reinstalled the canard to check for flushness... PERFECT!
Of course, everything gets repeated for the other side...
With the outside faces of the ETTSOs trimmed, it was time to trim the inside faces. So I reinstalled the canard (again).. reached from underneath and marked along the inside fuselage wall...
I then trimmed the inside faces of the ETTSOs...
Perfect!!
With the sides trimmed, I then focused on making the diameter of the opening a bit larger... I was afraid that it would have too tight of a tolerance and don't want the elevator torque tube to touch after it gets glassed. Note that the job of the ETTSO is to block any air from getting inside the fuselage, not to support the elevator torque tube - as a matter of fact, it shouldn't touch the torque tube at all!
Happy with the spacing, it was time to glass the ETTSOs. I first glassed the walls with 2 plies BID... transitioning about an inch onto the canard on both sides...
I then trimmed everything flush and tested the clearances...
Looking gooooood!
Happy with the way everything fit, I then uninstalled the canard (anyone keeping count of the times I installed and uninstalled the canard?!).. and focused on glassing the top surface of the ETTSOs... notice the grooves for the flox corners...
And applied 2 plies BID...
I then trimmed everything up and test it out... PERFECT FIT!!!

Super happy with the ETTSOs!!! Very little air will be getting through these...
With the canard side complete... it was time to focus on the fuselage side... notice the gap between the canard bottom and fuselage wall...
So I uninstalled the canard (for real, Im not kidding, again)... and put duct tape to act as a quick release for the pour foam...
I poured liquid foam to the fuselage and installed the canard onto it...
After cure, it was a perfect match!
I then sanded everything nice and neat...
Before glassing, I thought it would be a good idea to test fit the canard one more time... like a glove!
I then sanded and prepped all mating surfaces...
Even the "armpits" were going to get glassed, so those got prepped too...
I then glassed 2 plies BID to the outside and inside surfaces....
Inside shot of the armpits..
After cure, I trimmed everything up...
Perfect fit!!
But before glassing the top surface, I thought I should probably sand off about 1/16" to allow for a silicon seal later... so I drew a line all around the perimeter...
After sanding down to remove the line, I checked the tolerance one last time...
Oh man that's looking good!
Happy with the clearances, I prepped the top surface for glassing. Also, notice the groove for the flox corner all around...
I then installed 2 plies BID all around...
After cure, I trimmed everything up nice and flush!
And there you have it!! The canard, elevator torque tubes and fuselage walls in perfect harmony!


No comments:
Post a Comment